This documentation provides instructions for updating the firmware of a SmartCast® Wireless network using the SmartCast® Configuration Tool.
FIRMWARE UPDATE PREPARATION
The following procedures must be completed prior to updating the firmware in SmartCast® Devices.
Power Check
It is important that all devices are powered during the update process.
- Verify that all SmartCast devices are connected to unswitched AC power. SmartCast devices should not be connected to traditional power on/off switches or non-SmartCast occupancy sensors.
- If SmartCast devices are connected to a switching panel, verify that the panel programming has been overridden permanently or that scheduled events have been temporarily disabled until the update is complete.
- Verify all SmartCast dimmers are powered. When a button on a dimmer is pressed, the blue LED should illuminate.
- Verify all luminaires have power. Luminaires should be ON or should be able to be turned ON by entering the space and triggering the motion sensor or by turned ON using a dimmer.
Network Verification
For best performance, it is necessary to have a complete and contiguous address space.
CONNECT TO THE NETWORK
- Power on the SmartCast Configuration Tool while in the space to be updated.
- Connect to the Lighting Network following the on-screen instructions. Note how long it takes to discover all devices.
- If the Configuration Tool successfully finds all devices, skip to Step 8.
- If the Configuration Tool does not find all devices, this means that some devices were not powered on or may be located in an area with limited wireless reception.
- Follow the procedure for “Power Check” to verify that all devices are powered.
- Ensure that you are located in the center of the lighting network.
- Retry finding all devices using the Configuration Tool.
- From the “Main Menu”, press and hold the BACK arrow until the “System Update” menu is shown. The first option on the “Main Menu” is “Modify Groups”.
Create a System Report
Create a System Report to analyze the Initial State of the Network to verify the need for the firmware update.
- Select “Generate Report” to create a Device Table XML report on the Configuration Tool.
- Connect the Configuration Tool to a PC using a USB cable and the USB port on the bottom of the Configuration Tool. The Configuration Tool shipped with a USB cable for this purpose. If the cable is missing, an off-the-shelf USB cable can be used.
- The Configuration Tool will appear as a USB drive called “CREE_CT”. Windows may need to install the device before the drive appears.
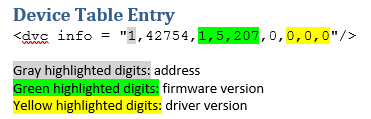
- Open the “DVCTABLE.XML” file. See the image below to read entries in “DVCTABLE.XML.”
- Identify the highest address listed in the file. Does the highest address match the number of devices in the network? If it does, there are no missing devices; skip to the next section.
- Examine all entries in the file. The addresses should increase sequentially without skipping any numbers. If there are addresses skipped, count how many are missing or skipped. If there are 10 or more missing or skipped address, the network should be reset and OneButton Setup performed prior to updating SmartCast devices. This will erase the current settings and groups.
- If the number of missing or skipped addresses is less than 10 and it took less than 8 minutes to discover devices (time noted in step 2), you are ready to update SmartCast devices. If discovering devices took 8 or more minutes, the network may have some devices experiencing inconsistent or weak communication. It is recommended that the network be reset and reformed in two or more networks to improve performance. For help with this, contact Cree Technical Support.

UPDATE THE SMARTCAST DEVICES
Load the Firmware Update Files onto the Configuration Tool
- Connect the Configuration Tool to a PC using a USB cable and the USB port on the bottom of the Configuration Tool. The Configuration Tool shipped with a USB cable for this purpose. If the cable is missing, an off-the-shelf USB cable can be used.
- The Configuration Tool will appear as a USB drive called “CREE_CT”. Windows may need to install the device before the drive appears. Copy the required files from the list below for the devices to be updated from your computer onto the “CREE_CT” drive.
- Disconnect the Configuration Tool.
Firmware Files Legend
| SmartDriver Filenames | Device Type |
| c0009129_1307.CEF | CR22 30K, 35K, 40K, and 50K |
| c0009129_CR22_Digital.CEF | CR22 30K, 35K, 40K, and 50K |
| c0009129_CR24_CS14_Digital.CEF | CR24 30K, 35L, 40K,and 50K CR14 30K, 35K, 40K, and 50K CS14 |
| c0009129_CS18_Digital.CEF | CS18 |
| c0009129_ZR22T_SC.CEF | ZR22 |
| c0009129_ZR24T_40L_SC.CEF | ZR24 4000L |
| c0009129_ZR24T_50L_SC.CEF | ZR24 5000L |
| c0009129_ZRFD.CEF | ZR |
| c0009129_ZR-Digital.CEF | ZR22, ZR24, ZR14 |
| c0102089_LN4-EZW_Digital.CEF | LN4 |
| c0110001_153_DRIVER-25.cef | |
| c0110001_CR22_ACK_.CEF | CR22 Tunable White |
| c0110001_CR24_ACK.CEF | CR24 Tunable White |
| Controls Firmware Files | |
| g0114207.cef | Configuration Tool Gateway |
| i0114207.cef | SmartCast Wireless Gateway |
| m0114207.cef | SmartCast Wireless Relay Module (CIF) |
| p0114207.cef | SmartCast Plug Load Controller |
| r0114207.cef | All SmartCast Luminaires RFMs |
| s0114207.cef | Cadiant SRFM |
| w0114207.cef | SmartCast Wall Dimmers |
| x0114207.cef | Configuration Tool |
| y0114207.cef | SmartCast Wireless Interface Module (WIM) |
Update the Firmware with the Configuration Tool
For each firmware type:
- Power on the Configuration Tool in the space to be updated.
- Connect to the Lighting Network following the on-screen instructions.
- From the “Main Menu” screen, press and hold the BACK arrow until the “System Update” menu is shown. The first item listed on the “Main Menu” screen is “Modify Groups”.
- Select “System Update”. The Configuration Tool will indicate when the updates are complete and will turn off.
- Power on the SmartCast Configuration Tool while in the space being updated.
- Connect to the Lighting Network following the on-screen instructions. Note how long it takes to discover all devices.
Create a System Report to Verify Success
- From the “Main Menu”, press and hold the BACK arrow until the “System Update” menu is shown. The first option on the “Main Menu” is “Modify Groups”.
- Select “Generate Report” to create a Device Table XML report on the Configuration Tool.
- Connect the Configuration Tool to a PC using a USB cable and the USB port on the bottom of the Configuration Tool. The Configuration Tool shipped with a USB cable for this purpose. If the cable is missing, an off-the-shelf USB cable can be used.
- The Configuration Tool will appear as a USB drive called “CREE_CT”. Windows may need to install the device before the drive appears.
- Open the “DVCTABLE.XML” file. A reference for reading entries in “DVCTABLE.XML” can be found later in this document.
- Check the firmware version for all entries.
NOTES
- The update process takes 2 or more minutes per files. Fixtures require two files and will take 4 or more minutes. Dimmers require one file and will take 2 or more minutes. The updates will be sent one-by-one.
- The entire process depends on the number of fixtures and switches: (number of dimmers X 2 minutes) + (number of fixtures X 4 minutes).
- While a fixture or switch is being updated, it will not be able to be used. Fixtures will be on and producing light, but they will not be controllable from a switch or sensor.
- If a fixture or switch is not successfully updated, you may need to try again with the Configuration Tool located closer to the device.
- If a fixture is stuck OFF after attempting to update it, please contact Cree for assistance.
